


Import Coordinate Data (Points)
Text files, DBF files, or Excel files can be used to import point geographies and require coordinate data. Before trying to import one of these files, review the pages detailing the respective formatting requirements: text file, DBF, or Microsoft Excel file. At a minimum, the file must include x and y coordinates, and an ID column; it may also include datasets, and time boundaries needed for time series data. All data in a project should be in the same coordinate system or projection to overlay properly.
To import new geographies, or to merge a point geography with an existing
one, browse to the File menu and select  Import ->
Polygon or point file. The dialog box below will appear. In
this example, the file "Excel_import.xls" is used. This
file is also featured on the Excel
file page.
Import ->
Polygon or point file. The dialog box below will appear. In
this example, the file "Excel_import.xls" is used. This
file is also featured on the Excel
file page.
You can click on many of the boxes in the screen images below for more information.
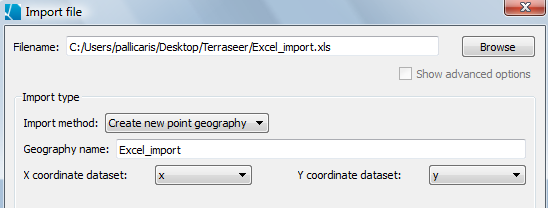
The next step is to select the desired file. SpaceStat will identify the file type, and then determine what import options can be used. In the example below, the file type is shown as an Excel file (.xls). Recall that, at this time, SpaceStat can not import files from Excel in the 2007 .xlsx file format. Other tips for working with Excell files can be found here).
Create a new geography. In this example, the file will be imported into a new project, so the only option available is to create a new point geography. If the file was imported into a project that already contained a point geography, the merge options would also be present. This scenario is explored with a shapefile example here.
SpaceStat will automatically name the geography the same name as the imported file (see the box to the right of "Geography name"). Use the Geography name field to give the geography a different name if desired.
The next section of the import dialog defines the x- and y-coordinate datasets. These selections identify which columns in your file contain the x coordinate (location on a horizontal axis) and y coordinate (location on a vertical axis). In the Excel file we used (shown here), these columns are conveniently labeled as "x" and "y".
Merge a new shapefile with an existing point geography.
To merge a new shapefile with an existing point geography, select the "Merge a point geography with an existing geography" from the Import method drop down menu. A new set of options will appear, prompting you to identify the name of the field in each file that should be used as the ID field.
Merging point geographies also includes some "advanced" options that you can see by checking the "Show advanced options" box (below the "Browse" button). Two of these options ask you to confirm that new data for a given object and time should overwrite old data for that same object in time. This would be the case if you want to replace some of the data in the original file with information from the new file.
Similarly, to confirm that you want to merge datasets with the same name, leave the "merge data" box checked. For example, you would make these selections if you wanted to extend the duration of time covered by the datasets by adding new observations. If you do not want to merge these datasets, uncheck the box. For example, if the same variable name is used in multiple files, and actually represents different variables, you would uncheck the box to prevent your data from being merged or overwritten inappropriately. Problems with merging data?
Choose how time is represented. The next step in importing a point file is to define how times are represented in the file. Use the drop-down menu to choose a Time format - either time slice or time series. In this example, all of the units (people) change their disease status and location at different times, so the appropriate format is a Time series. Choosing this format will enable the additional input boxes shown below. The default "Time representation" is set to Dates, which is appropriate for this example. You may use the drop-down menu to view the other options. Note that the "Start time field" and "End time field" boxes on the right side are disabled because the “Time representation” is set to Dates.
Next, you will define which columns in the spreadsheet represent the Object id field (in this example, "ID"), the starting date, and the ending date.
If datasets in the file include a missing value code, check that box and enter the appropriate code. Select OK to import your new point geography into SpaceStat. The name assigned to your geography will appear in the Data View. To view the geography in a map, right click on the geography name, and select "Add to map."