


Import Shapefile or Geodatabase File
To import new shapefiles (polygon, point, or line geographies), or to
merge a new geography with an existing one, you will start by going to
the File menu and selecting  Import,
then Polygon or point file. To import a feature class from a geodatabase
file, you will start by going to the File menu and selecting
Import, then Esri geodatabase. This will open up the dialog box
that is shown in the excerpts below. The shapefile example uses
a shapefile containing polygons from the Illinois
tutorial that is installed along with SpaceStat. Recall that
all data in your project should be in the same coordinate
system or projection to overlay properly.
Import,
then Polygon or point file. To import a feature class from a geodatabase
file, you will start by going to the File menu and selecting
Import, then Esri geodatabase. This will open up the dialog box
that is shown in the excerpts below. The shapefile example uses
a shapefile containing polygons from the Illinois
tutorial that is installed along with SpaceStat. Recall that
all data in your project should be in the same coordinate
system or projection to overlay properly.
You can click on many of the boxes in the screen images below for more information.
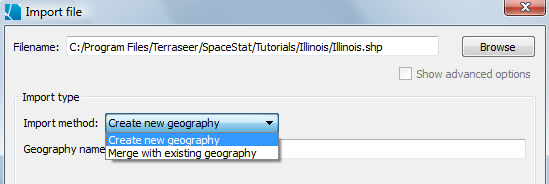
The next step when importing a shapefile or geodatabase file is to browse to the file that you want to import. Once you select a file, SpaceStat will identify the file type, and then determine what import options can be used with this file type.
In the example below, the file type is shown as a shapefile (.shp), and there is already another geography in the project that is in use. As a result, SpaceStat shows two possible import options in the import drop-down menu - Create or Merge. If a shapefile had NOT already been imported into the project, the only option would be to "Create new geography". The same process works for geodatabase files. If there are already geographies of the same type in SpaceStat, you can merge your geodatabase with this pre-existing geography or import it as a new geography
Create a new geography.
In the first example (below), we will treat the file as a new geography and then will show the options for merging next. To skip the merging section and go on to the section of the dialog box that handles time, click here. Once you have browsed to and chosen your file, SpaceStat will name the geography based on the shapefile name. If you want to change the name, do so in the box marked "Geography name" (partially covered below).
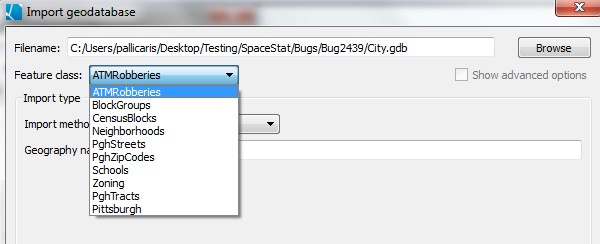
The dialog is similar for the geodatabase. The only additional step is that you will need to choose which Feature class you are interested in importing.
Merge a new shapefile or geodatabase with an existing polygon geography.
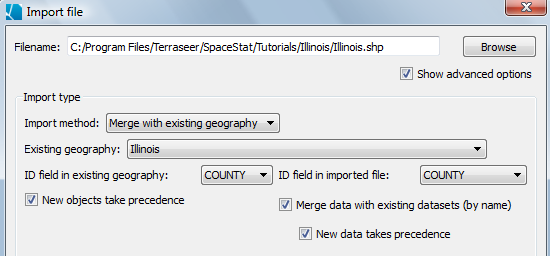
If you choose to merge a shapefile or geodatabase with an existing geography, a new set of options will appear. These will allow you to identify the name of the field in each geography that should be used as the ID field. Merging geographies also includes "advanced" options, accessed by checking the "Show advanced options" box (below the "Browse" button).
The “New data takes precedence” option is a confirmation that new data for a given object and time will overwrite the previous data for that same object in time. These options are used when you want to replace some of the data in the original file with information from the new file.
Checking the “Merge data with existing datasets” option confirms that you want to merge datasets with the same name. This option is used if you want to extend the duration of time covered by the datasets by adding new observations. If you do not want to merge the files, uncheck the box. For example, if you have the same variable name representing different things in different files, you could uncheck the box to prevent your data from being merged or overwritten inappropriately). Problems with merging data?
Choose how time is represented
The next step in importing a geography is to define how times are represented in the file. In the upper left corner of the "Time options" section of the dialog, use the drop-down menu to choose a time format - either time slice or time series. In this example, all of the units (counties) change together, so a time slice format is appropriate.
Shapefiles only allow you to represent each object once, thus in most cases you will import a polygon shapefile as a time slice, especially if it is representing static political boundaries.
Note that you may associate time series datasets with a geography that has been entered as a time slice at a later time, and/or you may merge a second version of a geography with the first version to allow you to work with a geography that changes over time.
The next step is to decide how to format the temporal data. This will allow SpaceStat to determine what information is required when the time stamp is set for the geography. Below the time representation menu there is a button marked "set" (the set button is hidden behind the time format options in the image directly above). Press the "set" button to open the geography time stamp dialog, shown in the next image.
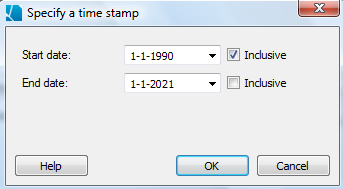
The "Specify a time stamp" dialog will appear when you click the Set button. This dialog will allow you to define the start and end dates, times, dates and times, or arbitrary units required for the data (whatever was specified under time representation, above). Note that this value is for the entire geography, and datasets that you work with may have dates/times that encompass a subset of what is entered on this dialog. This stamp will determine when the shapefile is visible in maps, and, if applied to all datasets, how values are treated in analyses, so make sure you double check the stamp.
As described in the Illinois tutorial, the datasets used with the counties shapefile describe population projections from 1990 til the end of 2020. Therefore, the start date will be changed from the default (1-1-2001) to 1-1-1990. Leave the "inclusive" box checked. Then enter 1-1-2021 for the end date, and leave the "inclusive" button unchecked. This indicates that the time slice ends at the very end of the year 2020. Click OK to close the time stamp dialog, then verify that the dates which appear after "Geography time stamp" reflect the changes you just made.
If your geography does not contain datasets, or if all of the datasets should be time stamped in the same way as the geography, click OK at the bottom of the dialog to import the shapefile. If datasets in the file include a missing value code, check the box and enter the code that you used. If datasets in the same file require separate time stamps, see more information on how to group and stamp datasets here, and see the example in the Illinois tutorial. The option to include a missing value code does not apply to geodatabase files.
Once you click OK, the geography will appear in the Data View. To view the geography in a map, right click on the geography name, and select "Add to map."
Calculation of spatial weights for very large geographies
If you have a very large geography, the import process may appear stall as SpaceStat calculates spatial weights. You can wait for the calculations to complete, or you may skip these calculations during the import process. If you select to skip this step during import, the spatial weights will be calculated later if they are needed for a statistical method.
Error message: Self-intersecting polygons
In some polygon geographies, polygons that share one ID have boundaries that self-intersect. This will trigger an error message from SpaceStat that will appear in the Log view.
For example, the images below appear when the National Cancer Institute's State Economic Area geography (available from the NCI website) is imported. This is due to the fact that one of the polygons in Texas self intersects (the orange SEA on map).
Information on how to identify this and other problematic polygons is given in the error message (bottom-left of image), which allows you to find them in the table and highlight them on the map.
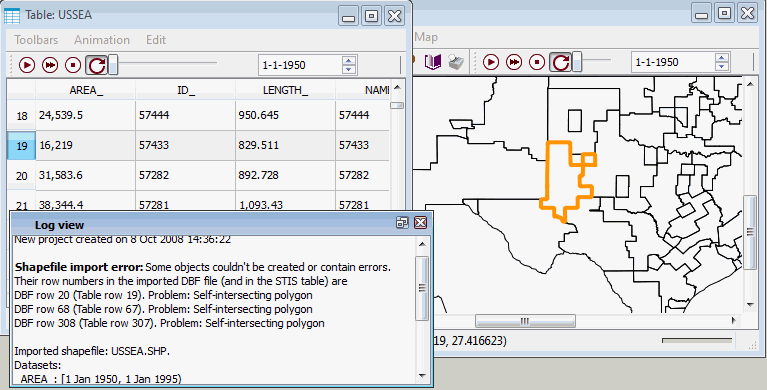
SpaceStat can map these polygons and includes them in the tabular data but self intersecting polygons will be excluded from Scale Conversion/Interpolation methods. Often, you can make small edits in the shapefile (in a GIS software program such as ArcGIS) to correct this problem, and then re-import the file into SpaceStat (it is not currently possible to edit polygon boundaries within SpaceStat).