


Import Datasets
You can import a dataset that links to a geography as a text file, DBF, or Microsoft Excel file. Each link will take you to the page detailing the required format for each file type. At a minimum, a dataset file must include an ID column which links it to the existing geography. The dataset file may also include time boundaries needed for time series data.
To import new datasets, or to merge a dataset with an existing one,
select  Import -> Polygon
or point file. This will open up the dialog box that is shown in
the figures below. This example uses an Excel file
"bresea5.xls", a collection of datasets downloaded from the
National Cancer Institute's website. The
file is described here
on the Excel file page. These datasets will be merged with a State
Economic Area polygon geography (USSEA.shp) that is also available for
free download from the NCI website.
Import -> Polygon
or point file. This will open up the dialog box that is shown in
the figures below. This example uses an Excel file
"bresea5.xls", a collection of datasets downloaded from the
National Cancer Institute's website. The
file is described here
on the Excel file page. These datasets will be merged with a State
Economic Area polygon geography (USSEA.shp) that is also available for
free download from the NCI website.
You can click on many of the boxes in the screen images below for more information.
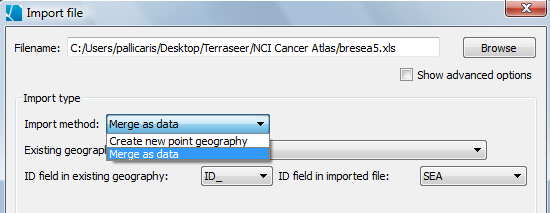
The first step is to browse through the files on your computer to locate the file that you want to import. Once you select a file, SpaceStat will identify the file type, and then determine what import options are available. In the example below, the file type is shown as an Excel file (.xls). Recall that at this time, SpaceStat cannot import files from Excel in the .xlsx file format. (See this and other tips for working with Excel files here.)
To import files as datasets that will be merged with a geography, you must already have imported at least one geography such as a shapefile for polygons, or as a shapefile or coordinate data for a point geography. Select the Import method “Merge as Data” since you are importing datasets rather than a new point geography. The next step is to identify the dataset in your geography that represents the ID. In the NCI's shapefile for SEAs, this ID is "ID_", and in the breast cancer datasets, the ID is "SEA" (see image below).
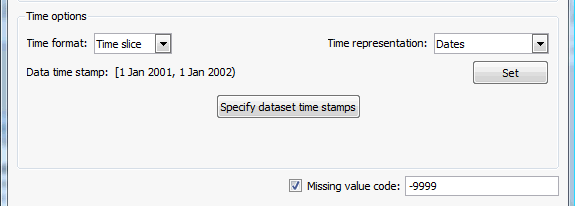
Choose how time is represented
The next step in importing datasets is to define how times are represented in the file. Use the drop-down menu to select a time format - either time slice or time series. In the bresea5.xls file, all of the data are organized into columns of "time slices", in that each column represents a different five year interval, with the dates included in the column header (i.e., CWF5054 is the Count of White Female breast cancer cases for the years 1950-54). The default "Time representation" option is Dates, which is appropriate for this data.
We won't be time stamping a geography in this case, so ignore the "Set" button to the right of the line showing the default geography time stamp.
The next several steps required to import the breast cancer data include grouping and date stamping all of the columns in the Excel file, such that the final result is a single dataset for each variable that changes over time. To start this step, click the "Specify dataset time stamps" button.
If you have multiple datsets that are made up of multiple time slices, it will be helpful to start by reviewing how to group datasets (described here), and then follow the link to see how to specify dataset time stamps, which includes a link to information on how to copy and paste time stamps.
Once you have finished setting the dataset time stamps, click "OK". The import dialog will appear again, refleting any new information that was added.
Finally, if datasets in the file include a missing value code, check that box and enter the appropriate code.